Event Registration Support
(Help Desk)
(Help Desk)
The Event Registration section is where you can choose what information you'd like to collect from your ticket buyers and where you can create "discount codes" for your ticket types.
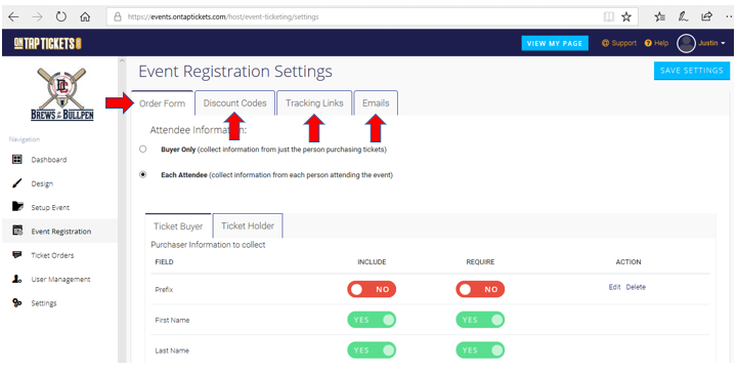
Per the screenshot below, the first thing you'll want to notice is that there's actually 4 different tabs on this page.
1. The Order Form tab, which is the page you land on. Here, you choose WHAT information you'd like to collect from each ticket buyer.
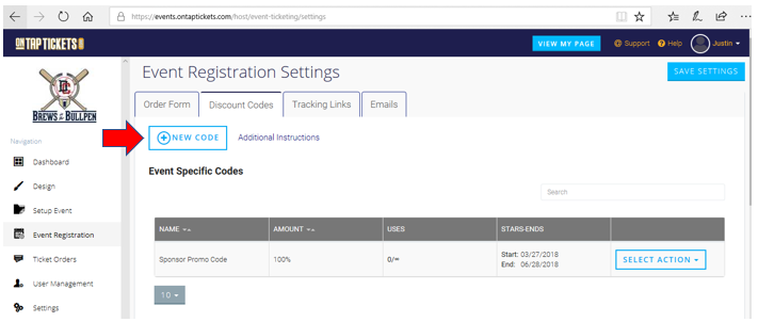
2. The Discount Codes tab, which is where you can create and customize discount codes for your event for each ticket type.
3. The Tracking Links tab, which allows you to create and copy a customized link (URL) to your event that you can share with anyone who may be helping you 'sell tickets.' Anytime a custom tracking link is clicked on (wherein someone then buys a ticket from that link/URL), it's tracked here so that you can see who is referring these ticket sales and how many sales were generated. For example, let's pretend you have a partner organization that's offering to help you sell tickets to your event. If you create a custom Tracking Link for them, they can share that with their own audience and anyone who purchases a ticket from their customized Tracking Link will be reported. Meaning, you'll see exactly how many tickets they helped you sell and how much revenue they generated in ticket sales.
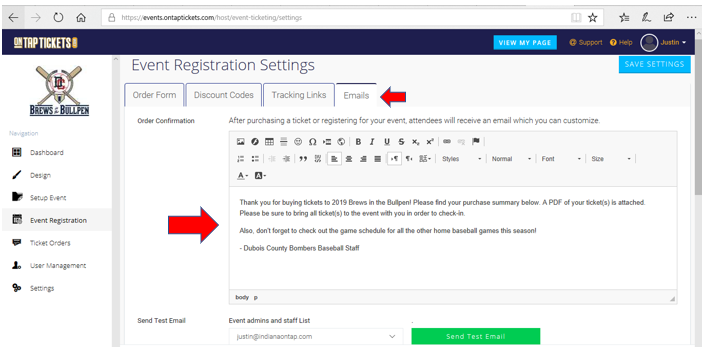
4. The Emails tab, which is an option that allows you to customize the 'order confirmation' email an attendee receives immediately after purchasing a ticket to an event.
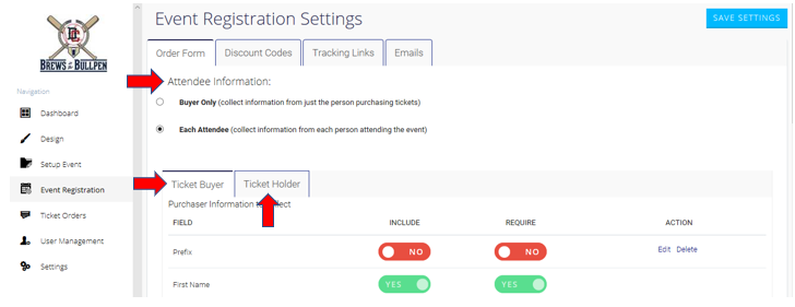
I. The fields and options in the Order Form page are rather self explanatory. Here, you can choose what information you'd like to collect for each ticket buyer. Important to note: Per the screenshot below, you actually have the option to collect information for the 'Buyer Only' (which is the person purchasing the tickets). Or, you can choose to require and collect the information for 'Each Attendee.' It's more common to collect the information from the 'Buyer Only.' This means that if one person purchases 2 or more tickets with his or her order, you're only collecting that single person's information. However, if you'd like to collect name, email, address, etc. of every ticket included in an order, you'd want to select the 'Each Attendee' option. This means that the person buying the tickets would be required to enter the information for each person he or she is buying a ticket for. Again, this is less common, but it's an option.
As you'll also see with the arrows in the screenshot below, you have the option to choose what information you'd like to collect from the Ticket Buyer vs. the Ticket Holder. (The Ticket Holder would only be relevant here if you choose to require and collect information from 'Each Attendee.'
Lastly, with all the available information fields, you can choose whether to include or require each information field. For example, perhaps you want to ask for the phone number of the Ticket Buyer. If you want to require that as a mandatory field, you'd set it as 'On' under the Require column. If you'd instead like to make it optional, you'd choose 'On' under the Include column. (I.E. that field would be included and optional, but not mandatory).
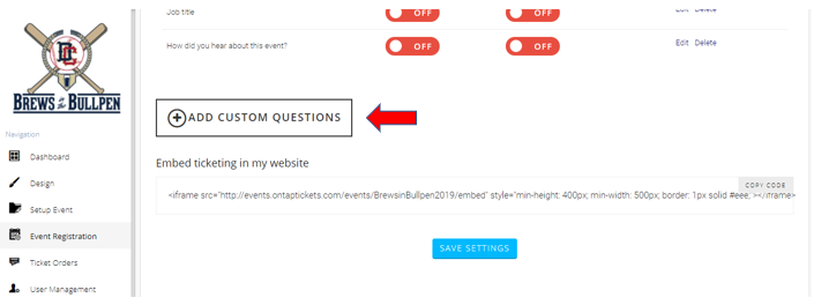
II. Important to note: Per the screenshot below, you have the option to create custom questions. This means you can choose to ask and collect fields of information not included. Simply click the "ADD CUSTOM QUESTIONS" box as shown below.
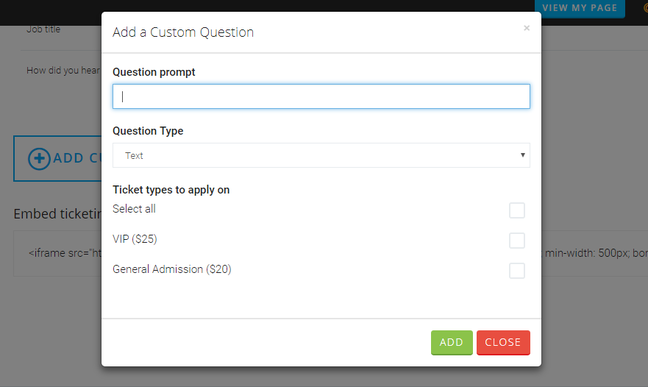
When you click the box to "ADD CUSTOM QUESTIONS," you'll see a popup, as shown in the screenshot below. Here, you can type out the question or field you'd like to collect. For example, a common custom questions is: "How did you hear about this event?" You can type that question in the 'Question prompt,' and then choose how you want that question answered (by a ticket buyer) via the 'Question Type' dropdown. You can choose to allow the answer as a text response (most common), a number, or even a date. You can even create a drop-down menu where the ticket buyer can choose from 'pre-selected' answers you create. Lastly, you can even choose to only use these CUSTOM QUESTIONS for specific ticket types you create.
III. Creating Discount Codes for your event is easy. Simply click on the 'Discount Code' tab and then select +NEW CODE, per the screenshot below.
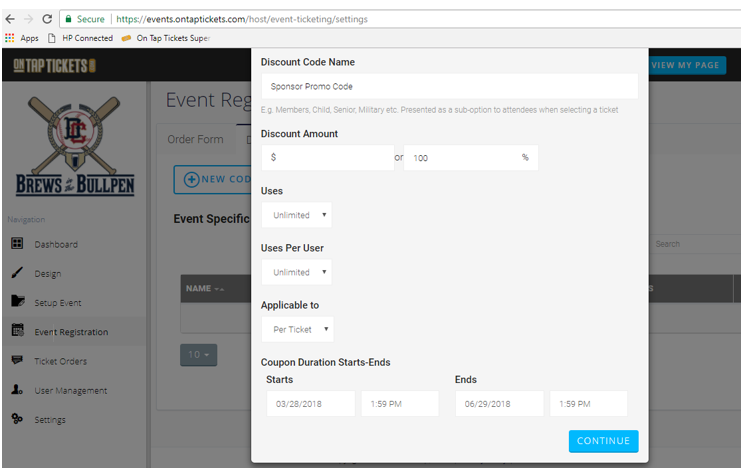
You'll quickly see you have multiple options to create discount codes, and you can choose to make the code(s) applicable to all tickets or specific ticket types. (For example, if you ONLY wanted to offer a discount for VIP tickets, you can choose to do that). Per the screenshot below, you'll see that you also have options to create your discount as a discounted dollar amount, or percentage amount. You can also choose how many times it can be used, if it can only be a certain number of times per user, etc. (To see a report of which discount codes were used for ticket orders and what the amounts were, simply visit your Dashboard tab, select "Ticket Sales Performance," and then click on the "Download Ticket Buyer Data" option at the very bottom of the page. Here, you'll be able to easily see what discount codes were redeemed for any order and what the amounts were).
IV. Customizing your 'order confirmation' Emails is easy! Simply select that tab and edit the text box (with the full HTML editor) with whatever messaging you'd like to share with each email confirmation an attendee receives. This is the same email that will also include the attached PDF document of the digital tickets for each order. The PDF with the tickets will always be included in the order email, regardless of what changes you make to the text of the email. (Screenshot below).
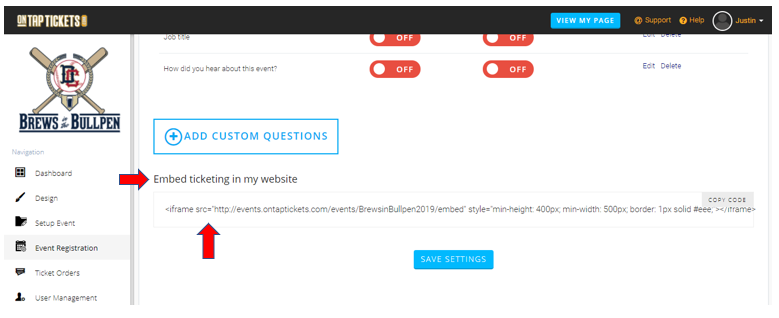
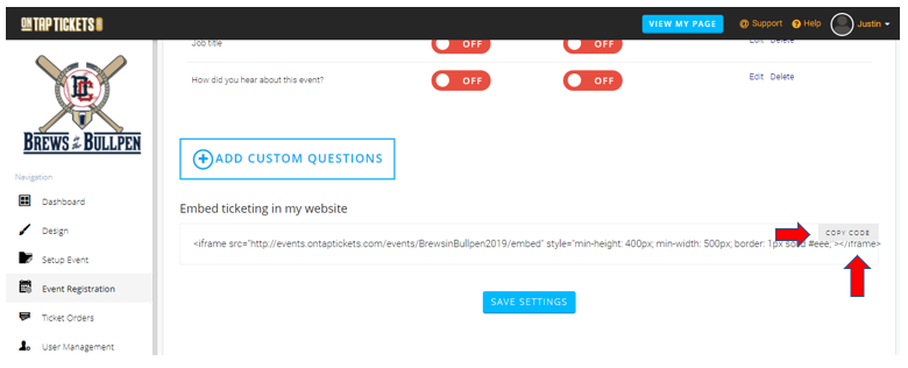
V. Lastly, the Event Registration page includes one of our favorite custom features...which is the option to embed your event's custom ticketing site into your own website. This is done via the "iFrame code" generated for your ticketing site, shown at the bottom of this page. When and why would you use this? If you had your own event website that you created for the event, and you wanted to keep the option to purchase tickets 'within' your own event website (as opposed to directing ticket buyers to your ticketing site to actually purchase their tickets), then this option allows it. There's some things you need to know, though, as this "iFrame" code is customizable to ensure it 'fits' in your own website however you want. Keep scrolling down to understand the customization options.
When embedding your ticketing site into your own website, you'll click the "COPY CODE" button shown in the screenshot below and add/paste that HTML "iFrame code" into the page or area of your website where you want your ticketing site to display. *If you don't know where or how to do this, contact the person who built your website with this code. He or she will be able to help.
<iframe src="http://events.ontaptickets.com/events/BrewsinBullpen2019/embed" style="min-height: 400px; min-width: 500px; border: 1px solid #eee;"></iframe>
<iframe src="http://events.ontaptickets.com/events/BrewsinBullpen2019/embed" style="min-height: 400px; min-width: 500px; border: 1px solid #eee;"></iframe>
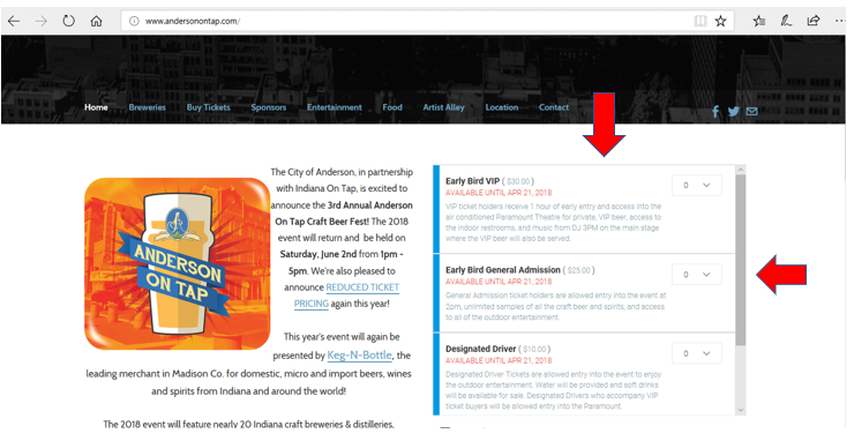
*Important to note: By default, when you copy and paste the code you're provided, it will just show you the ticket types and purchasing options (not the event description). Refer to the screenshot below. This is an actual event website that used the "iFrame code" provided. The code generated these ticket purchasing options where ticket buyers can select and purchase the tickets they like...all from within the actual event website (not the event ticketing site).
*Important to note: If you instead want to show the ENTIRE ticketing site within your own website (i.e. the event description plus the ticket types and purchasing options), you'll want to make some basic edits to the "iFrame code" we provide you. It's actually very easy.
Below is an example of the "iFrame Code" generated for this specific event. If you simply remove the word "embed" from this code (highlighted in red, below), and then paste that code into your website, you'll be able to see the entire event page within your own website. Most event organizers recommend this as they think it looks better.
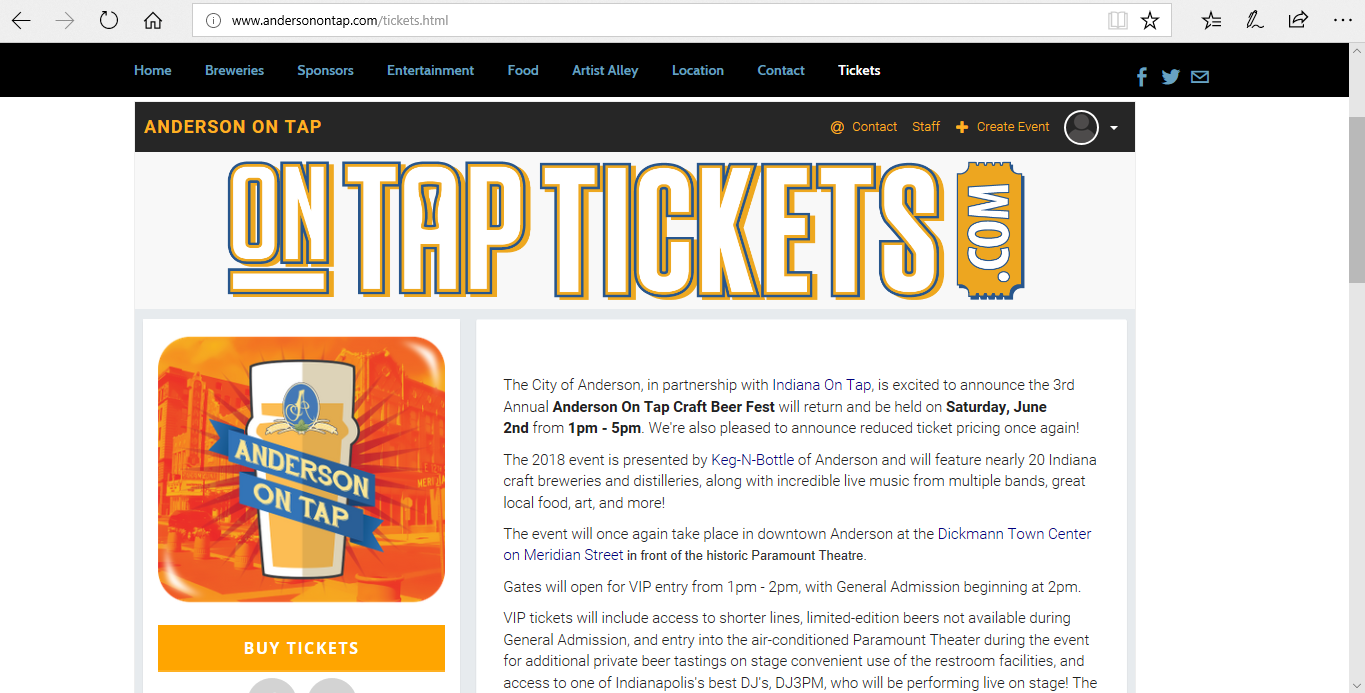
Furthermore, you can then customize the size of your "iFrame Code" to fit it into a specific area of your website or onto the entire page of the ticketing site. Simply adjust the numbers of the minimum height and width, (highlighted in green below). The screenshot below shows what our modified "iFrame Code" looks like. We removed the word 'embed' and changed the height to 1850 and the width to 1000 to make it fit perfectly in our own event website.
Default "iFrame Code":
<iframe src="http://events.ontaptickets.com/events/AndersonOnTap/embed" style="min-height: 400px; min-width: 500px; border: 1px solid #eee;"></iframe>
Modified "iFrame Code" to show 'entire' ticketing page:
<iframe src="http://events.ontaptickets.com/events/AndersonOnTap/" style="min-height: 1850px; min-width: 1000px; border: 1px solid #eee;"></iframe>
If you have ANY questions about using or modifying the "iFrame Code," simply contact us and we'll walk you through it!

