Dashboard Support
(Help Desk)
(Help Desk)
The Dashboard section is where it all starts. Here, you can walk thru all the steps needed to create your event and it's where you'll also access your Ticket Sales Performance.
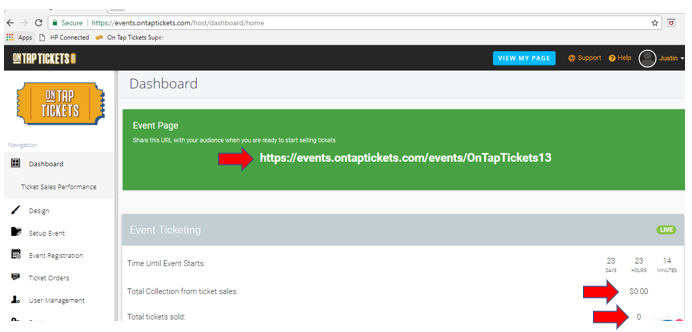
I. Per the screenshot below, the Dashboard will show you your live event URL that's generated as soon as you create your event (even before you have added or edited any information). This is the event URL you'll share to potential ticket buyers. *Important to note: You can customize the end of your Event URL to add the event name to the URL, which is great for branding. You can do this at the bottom of your dashboard or within the 'Design' area of your account.
Per the arrows on the screenshot below, your Dashboard is also a place where you'll be able to quickly see how many tickets you've sold to your event and much revenue you have generated in ticket sales.
Per the arrows on the screenshot below, your Dashboard is also a place where you'll be able to quickly see how many tickets you've sold to your event and much revenue you have generated in ticket sales.
II. Your Dashboard will also walk you thru the basic items to begin creating your event. Per the screenshot below, if you select any of these items/buttons (Name your event, Activate Payment Processing, Customize Event URL), you'll be directed to the area where you can customize (and integrate) these items. Once an item is complete, the 'button' on your dashboard will change from red to green! It's easy!
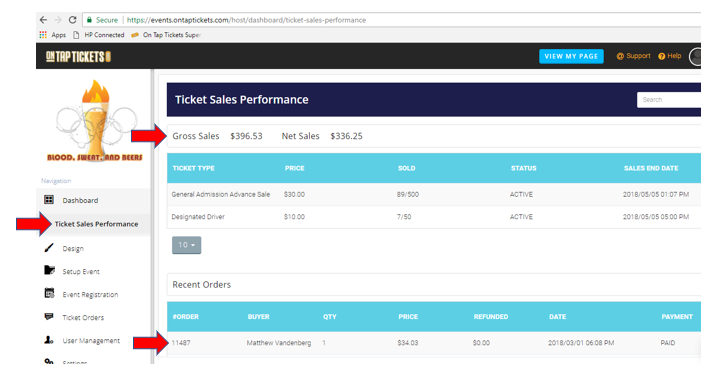
III. The Dashboard area also opens up the navigation menu item for "Ticket Sales Performance." This area will allow you to see a more in-depth view of your ticket sales and your recent orders. *Important to note: Per the screenshot below (first red arrow), the Ticket Sales Performance will show you the event's Gross Sales and its Net Sales. The Gross Sales are the total ticket sales WITH the ticket processing fees included. The Net Sales show the total ticket sales minus the ticket processing fees. The Net Sales number is the actual and total revenue the event has earned so far. As a reminder as well, all ticket sales are delivered to your Stripe account within 48 hours (on average) of every individual sale (excluding sales on weekends, which are delivered to you early during the next week). You're paid regularly leading up to your event as you sell tickets, not at the end of your event like many other ticketing sites.
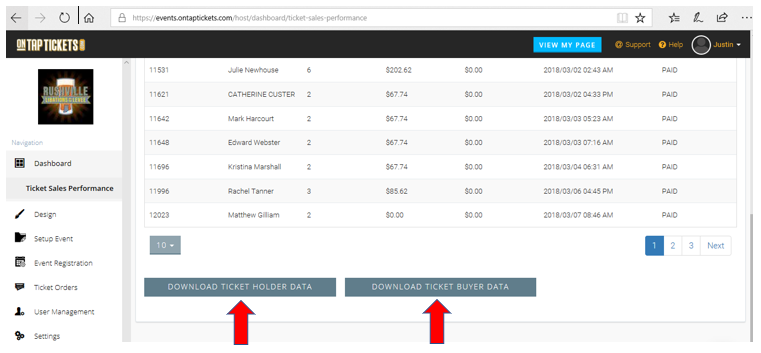
IV. Lastly, you'll also have the option to download all attendee information you are collecting for your event at any time (i.e. Ticket Holder and Ticket Buyer data). *Important to note: You should only download the ticket buyer data if you chose to collect that information as part of each ticket sale. (Ticket holder data is the information of the person who bought the tickets. For example, if the ticket holder bought 4 tickets in their order, you would only have that single person's information to collect. If you choose to collect the ticket buyer data as well when creating your ticket types for the event, the person buying the ticket would be required to enter all of the attendee information you'd like to collect for ALL tickets they choose to purchase. So, if the ticket holder purchased 4 tickets, they'd have to enter the individual information for each of the 4 attendees). *Tip: If you're looking to download a report that shows you a list of everyone who purchased a ticket (perhaps to use that list to check people into an event, simply download the 'Ticket Holder' report. This will always include all of the information from whatever attendee info you've chosen to collect.
This attendee information can be downloaded in a CSV format. If you use an email marketing tool, this is where you'll download all the ticket buyer data to then import into that tool. Below is a screenshot showing you where you can download this information. This option is located at the very bottom of the Ticket Sales Performance page.
The Ticket Buyer report is also where you can see what discount codes were used for any order, and what the amount of each discount code was. These are clearly shown in 2 different columns on that specific report.


